Please note that your subscription plan determines the specific set of features available to you, which may result in differences between what you see and the images presented in this article. For further details on the features included in your plan, please contact your OfficeSpace Admin.
Using the Access Control integrations available in the Admin module, you can integrate Safeguard questionnaires filled out by your employees with Brivo. Remember that you must be a System Admin or IT Admin to access integrations from the Admin Console.
Before You BeginConfiguring the IntegrationUsing the IntegrationDisconnecting Brivo and OfficeSpace Integration
Before You Begin
You'll need a copy of your Administrator ID to authenticate your instance of OfficeSpace with Brivo. You can find this by logging in to your
Brivo Access control panel.
An important note, it is recommended that you use a
service account for integrating OfficeSpace and Brivo rather than a personal account, which will keep the integration functioning correctly through employee moves and turnover.
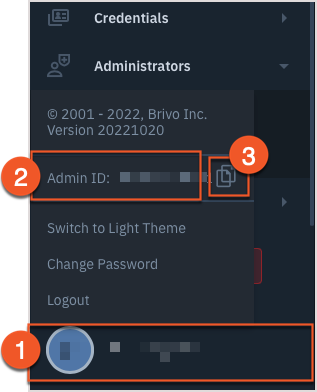
In the main navigation menu, select your
administrator account (1). You'll see your
Admin ID (2) in a pop-up. Select the
copy icon (3) in the pop-up to copy your Admin ID to your operating system's clipboard, and put it in a safe place for later in this process.
If you have any issues obtaining your Admin ID, please speak with your Brivo support representative.
Configuring the Integration
Accessing the Brivo Integration SettingsConfiguring the Integration in OfficeSpaceFinalizing Integration
Accessing the Brivo Integration Settings
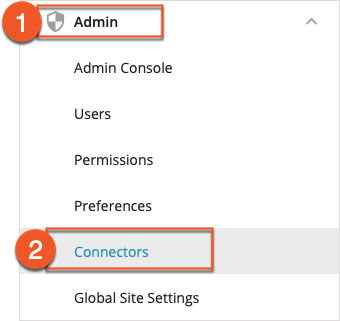
Using the Hamburger menu, navigate to
Admin (1), and then select
Connectors (2) to be taken to the Connectors page.
Under
Access Control Integrations (1), select
Connect to Safeguard and Desk Booking (2), then select
Brivo Integration (3) to continue.
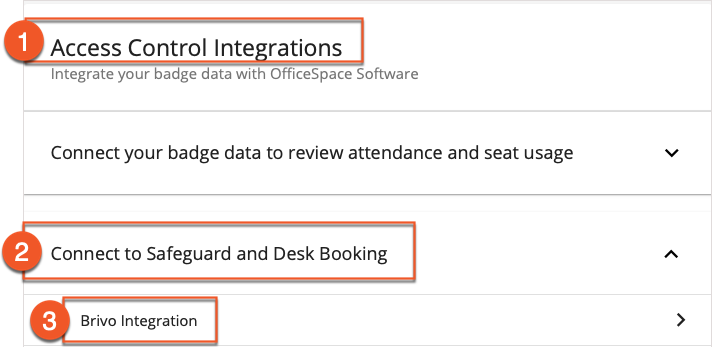
If you need to access the Integrations page from another area of Connectors, select
Access Control Integrations at any time from the
Connectors menu on the left-hand side.
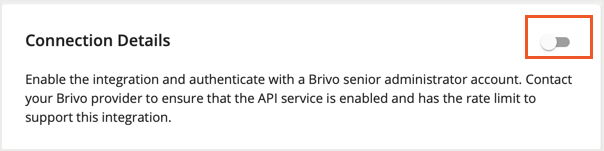
Activate
Connection Details via the
toggle.
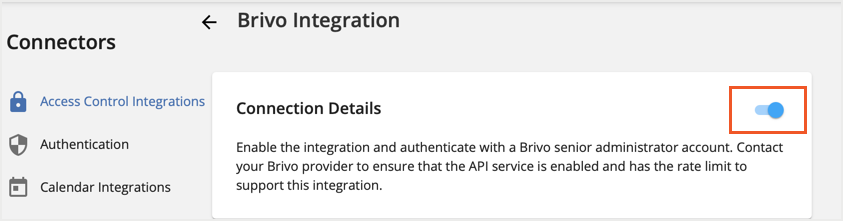
Integration is now enabled between a correctly-configured Brivo account and OfficeSpace. A new page opens, requesting authentication with Brivo. Enter the Admin ID you collected above, and your password, to enable OfficeSpace Integration.
To obtain these credentials, please speak with your Brivo representative.
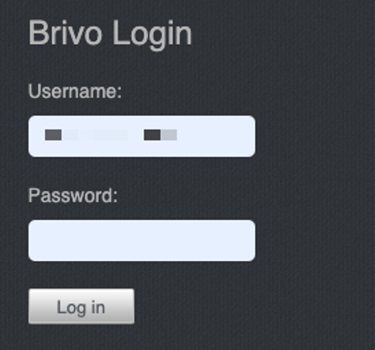
It is important to note that OfficeSpace does not store your Brivo credentials. If the integration is ever disabled, then a new, valid set of credentials will need to be entered to reactivate the connection between OfficeSpace and Brivo.
Configuring the Integration in OfficeSpace
Enter your API Key into the
API Key field (1) indicated in the API Key panel in OfficeSpace.
Select
Update Key (2) to confirm your entry.
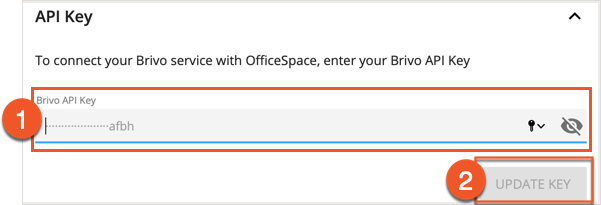
OfficeSpace stores your Brivo API key. The key is completely hidden once entered.
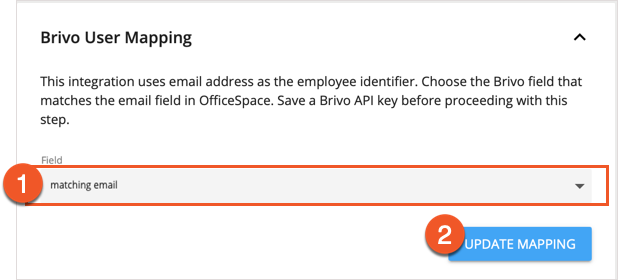
In the Brivo User Mapping area, you can use the
field dropdown (1) to select the field that will be used to pair users in OfficeSpace with users in Brivo. A common example of a field used for this purpose would be the email address field.
For an option to appear in this dropdown, it must be configured in your instance of Brivo. Please speak with your Brivo representative for assistance configuring this information.
Select
Update Mapping (2) to confirm your choice and store the mapping field in OfficeSpace.
Finalizing Integration
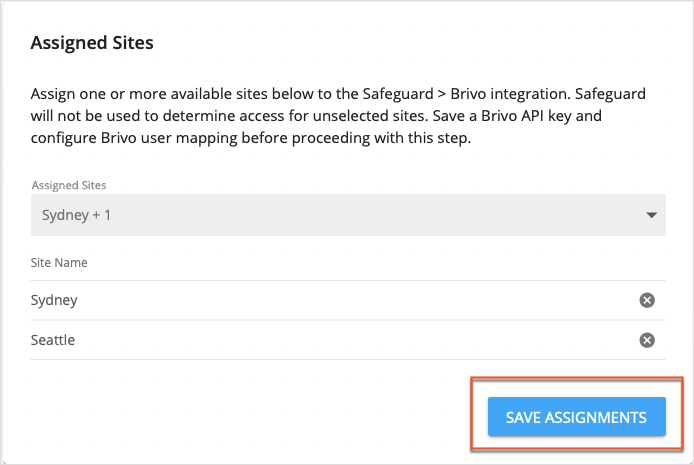
In the
Assigned Sites area you can now choose which sites will be integrated with Brivo. Only Safeguard results associated with the selected sites will trigger Brivo requests.
Selecting a site in the
Assigned Sites dropdown (1) will add it to the Site Name list, and selecting
Save Assignments (2) will store your selections in OfficeSpace. Note that if no sites are selected here, then no users will be managed based on their Safeguard results.
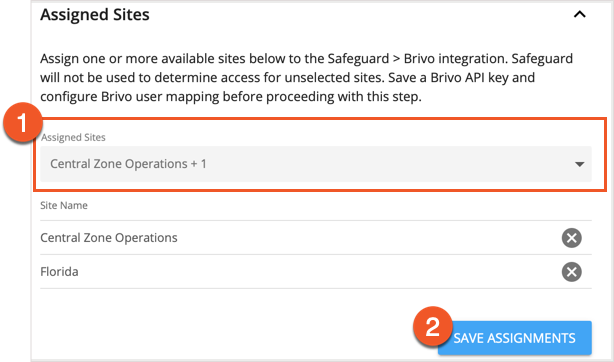
To assign a site, select the checkbox next to that site in the
site list (1). If you'd like to assign all sites in your organization, use the
Select All toggle (2) above the list. After you've chosen all of the sites you'd like to assign to Safeguard and Brivo, select
Ok (3) to close the pop-up.

Select
Save Assignments at the bottom of the Assigned Sites area to save changes and assign your sites.
Using the Integration
Now that integration has been configured, requests will be sent to Brivo based on Safeguard results.
| User Status | Safeguard Complete? | Pass or Fail? | Outcome |
|---|
| Active, in Group | Yes | Pass | Start and End date fields in OfficeSpace will be updated to new date for this user |
| Inactive, in Group | Yes | Pass | Start and End date fields in OfficeSpace will be updated to new date for this user |
| Inactive, in Group | Yes | Fail | No update to the Start and End date values occurs |
| Active, in Group | Yes | Fail | The End Date is updated to a date in the past (no access granted) |
| Active or Inactive, in Group | Yes | Pass or Fail | A "not found' error message will appear in the log file in OfficeSpace |
Logs
You can find details on the requests being sent by entering an email address or date in the
search field (1) for Logs, located under the Assigned Sites panel. After you've entered an email address or date, select
Search (2) to start the process. Results will be displayed in the
results field (3).
If you would like to expand the contents of an information pane, you can do so by selecting the
pop-out icon (4) next to each pane.
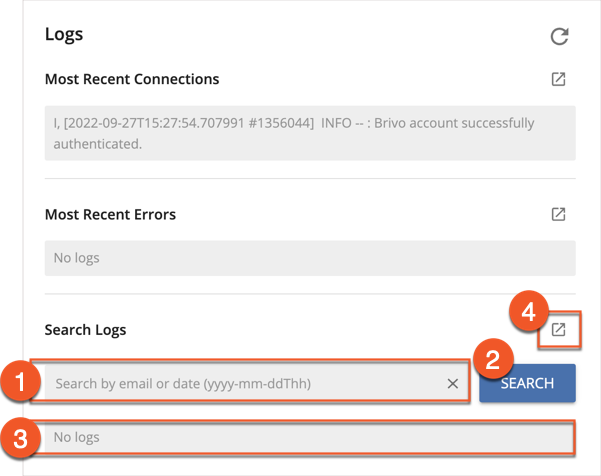
The Logs will display the following information:
- New connections between Brivo and OfficeSpace
- Safeguard Attestations received by OfficeSpace
- Safeguard Attestations received sent to Brivo
- Error messages, for example those concerning failed connections
The search field will accept a search for an email address or a timestamp in YYYY-MM-DD-TT:TT format (e.g February 3rd, 2021 at 17:43 UTC would be
2021-02-03-17:43).
Disconnecting Brivo and OfficeSpace Integration
To disconnect the integration, set the toggle on the
Connection Details panel to off. This action will both remove the entry from the list of active OfficeSpace Integrations on the Connectors page, and stop sending Safeguard results from OfficeSpace to Brivo.
If you would like to disable the connection from Brivo to OfficeSpace, please make sure you speak with your Brivo representative to see that data is not being sent.