Please note that your subscription plan determines the specific set of features available to you, which may result in differences between what you see and the images presented in this article. For further details on the features included in your plan, please contact your OfficeSpace Admin.
The Distancing Planner is a tool that you can use to maintain safe distancing measures in your workspaces. Manage the real world scale, define which seats will remain active using safe distancing guidelines, assign shift availability, and more. You can find the Distancing Planner in Move Manager.
Managing the Real World Scale
Managing Desks Using the Maximum Capacity
Auto Assigning Shifts Using the Maximum Capacity
Enabling the Distance Radius in Visual Directory
Managing the Real World Scale
The Distancing Planner works with the actual scale of your workspace to create a safe distancing plan in OfficeSpace. You can use the tool to indicate the real length or distance of a space on your floor plan, and OfficeSpace will calculate the real world scale of the floor plan and then determine the maximum safe capacity of the floor.
Setting Up the Real World Scale
Editing the Real World Scale
Setting Up the Real World Scale
In Move Manager, select the Distancing Planner icon on the Action Panel.

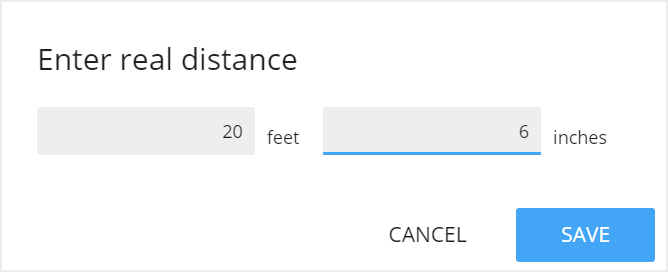
The Distancing Planner tab opens. You are then prompted to set the real world scale by selecting two points on the floor plan. Locate a distance on the floor plan that you know the exact measurement of, such as the width of a room. Select the start and end points of the distance.

After selecting the two points, enter the real length of the distance. The minimum length of the distance chosen must be six feet or two meters.
Editing the Real World Scale
You can easily make changes to the real world scale at any time. In the Distancing Planner, select the three dots above the Distance Radius and choose Reset Real World Scale.
You are then prompted to set the real world scale by selecting two points on the floor plan. Locate a distance on the floor plan that you know the exact measurement of, such as the width of a room. Select the start and end points of the distance.
After selecting the two points, enter the real length of the distance. The minimum length of the distance chosen
must be six feet or two meters.

Managing Desks Using the Maximum Capacity
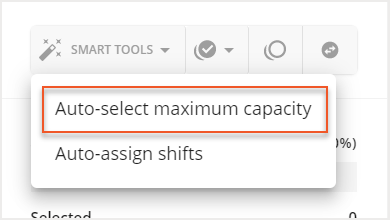
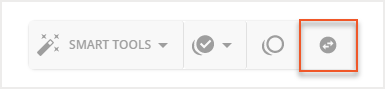
After you have set the real world scale, you can set the maximum capacity for your floor. Select the Smart Tools dropdown and choose Auto-select maximum capacity.

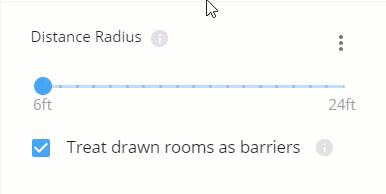
The Auto-select maximum safe capacity screen then opens. Use the slider (1) to select your desired safe distance radius. The tool automatically selects the maximum number of seats that you can use, based on the chosen safe distance setting. Then, you can use the checkbox (2) to treat the walls of rooms drawn in OfficeSpace as physical barriers. Then, choose Auto-Select (3).
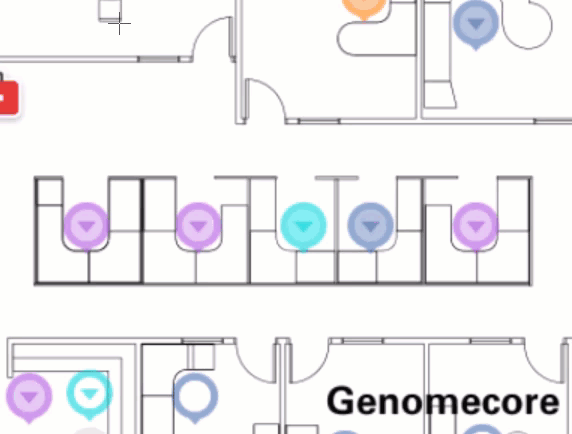
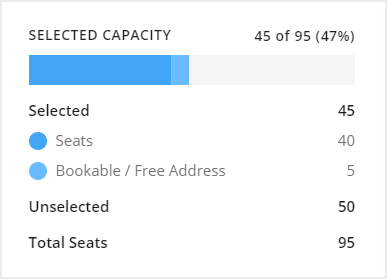
The Distancing Planner automatically selects the maximum number of desks on the floor plan that can maintain safe distancing based on your desired safe distance radius. Under the Selected Capacity section, you can view some metrics based on the selected desks, such as the percentage of total desks that were selected, the number of each desk type selected, and how many desks are unselected.
With the maximum capacity selected, you can use the Available Actions dropdown to complete a variety of actions to both the selected and unselected desks. These actions include assigning assets to the selected desks, changing desk types, vacating the unselected desks, assigning shifts to the selected desks, or changing the selected desks to inactive.

If you want to take other actions on the unselected desks, you can use the Invert selection tool to select all the desks that were not initially selected using the Auto-select maximum capacity tool.
Auto Assigning Shifts using the Maximum Capacity
You can use the Distancing Planner to automatically assign shifts to your desks based on the maximum safe capacity of your floor. The tool will assign two alternating shifts to ensure that the maximum safe capacity is maintained at all times. You will need to create your shifts prior to using this tool. Check out the Creating and Managing Shifts article for guidance.
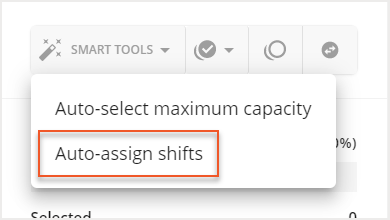
To automatically assign shifts, select the Smart Tools dropdown and choose Auto-assign shifts.
The Auto-assign shifts screen then opens. Use the dropdowns to select the two shifts that you want to assign.
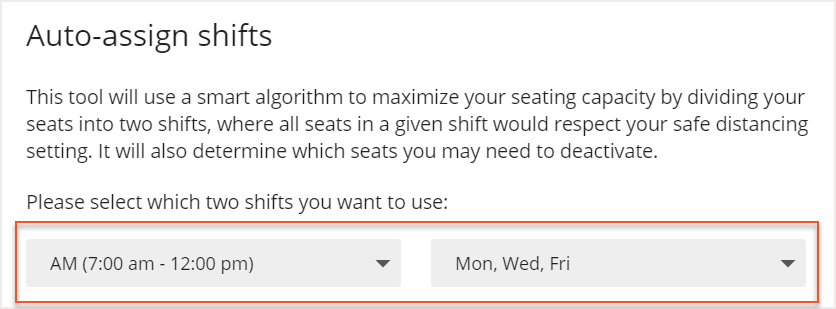
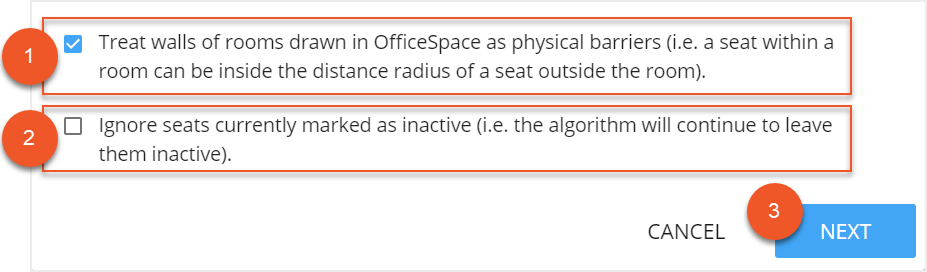
You can use the checkboxes to choose to treat the walls of rooms drawn in OfficeSpace as physical barriers (1) and ignore desks that are currently inactive (2). Then select Next (3).
Your shift assignments will be created and you can view them under the Activated Capacity section. The desks on the floor plan will be colored according to their coordinating shift. Select Save Shift Assignments to save your shifts.

Enabling the Distance Radius in Visual Directory
After you have set your distancing radius in the Distancing Planner, you can choose to have the radius display in Visual DirectoryⓇ.
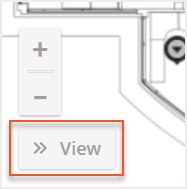
In Move Manager, select View to open the View Controls.
Ensure that the Rooms toggle is disabled.
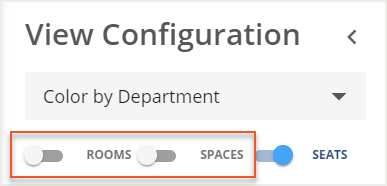
Then, select the Distancing Radius to enable it.

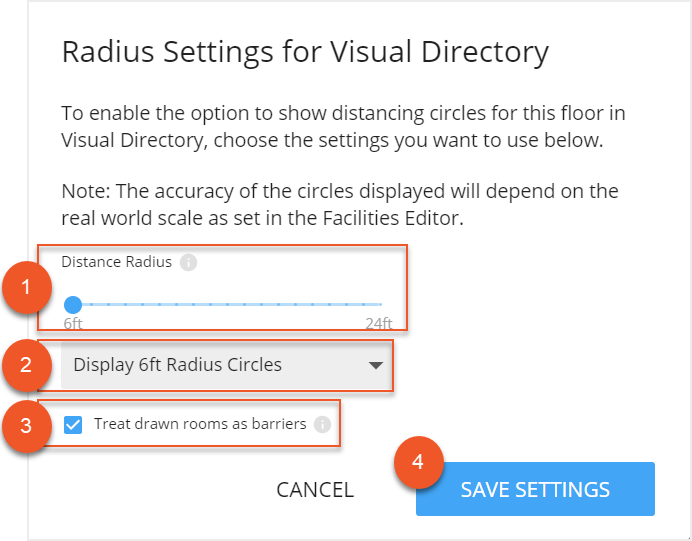
The Distancing Radius section then expands. To enable the distance radius in Visual Directory, select the Enable in Visual Directory checkbox.
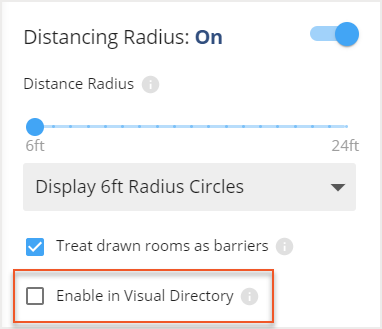
The Radius Settings for Visual Directory screen then opens. Here, you can also edit the Distance Radius (1), change the size of the radius circles (2) choose whether or not to treat drawn rooms as barriers (3). Select Save Settings to save your changes.
Viewing the Distance Radius in Visual Directory
After you have enabled the distance radius, your organization will be able to choose to view it in Visual Directory. To view the distance radius in Visual Directory, open the Legend and toggle Show Distance Radius to on.

The radius circles now show on your floor plan.

